显示标签为“PowerPoint tips”的博文。显示所有博文

7/21/2010

PowerPoint Lecture Room 1: Ways to Make an Excellent PowerPoint

In comparison with hand-drawn or mechanically typeset slides, black/whiteboards, or overhead projections, the easy-to-use Microsoft Office PowerPoint is popular with business people, educators, students, and trainers for its high permeability.


Despite the functions of Microsoft Office PowerPoint are being upgraded as the launch of new version, and its style, animation and multimedia abilities have become little more sophisticated gradually, there are also some tips the presenters, especially the new-hands, should pay attention to.


In this article, I will tell you several completely simple and non-time-consuming tips on how you can make a great PowerPoint Presentation. If you are a seasoned PowerPoint user, you would have probably heard this all before, please do not bother leaving some comments to listing unmentioned tips.


  1. Never put too much on one slide. If you have loads of information, you can either say it out aloud or put it on several slides. If you spread it out, it looks like you are more knowledgeable about the subject anyway.

  2. Keep the text large enough. A common trap that so many people fall into is having the text too small. If people cannot read what you have said, there is no point in saying it! That you can read it sitting at your computer does not mean that people sitting several meters away can read it too.

  3. Pay attention to the fonts. Although you have lots of freedom to choose the fonts, please make sure that the fonts should be big enough for people to read and in a legible style. As for the style, you also need to keep with the theme of your PowerPoint. By the way, you can find many great FREE fonts at internet and there are instructions on how to install them on the site.

  4. Be consistent in theme. It does not mean that you cannot have more than one theme, but just means that you should have the same theme for the same subjects. For example, you could split your presentation into four parts and have a different theme for each part. Do not have a different theme per slide!

  5. Keep the colors coordinated. Do not have white text on a white background. Obviously, no one would do that, but you should get the gist of it. Make sure that each of your slides has the maximum contrast between the text and the background. You could use PowerPoint’s built-in color schemes, but if you are using a picture from a background, you just have to decide yourself whether you can read ALL of the text or not.

  6. Vary the slide content. If each slide only contains bullet points, the lack of variety will bore your audience, so simply change the layout using the function that comes up whenever you make a new slide.

  7. Be enthusiastic. If you are genuinely enthusiastic about what you are presenting, then some of your enthusiasm will "rub off" on the audience and they will enjoy your presentation more.

  8. Avoid any spelling errors. The subtitle says it all really, and this is truly embarrassing, so avoid it at all costs.


Now you have all of these great tips, there is nothing to stop you from making a great presentation.


PS: Great PowerPoint cannot do without beautiful and suitable templates, here are some free PowerPoint templates of various themes you can download, and I wish you would like them.


Links: PowerPoint Lecture Room 2: The 10/20/30 Rule of PowerPoint


7/19/2010

How to Prolong the Grace Period of Microsoft Office 2010

Microsoft Office 2010, which became available for retail as well as online purchase on June 15, has various new features and improvements including extended file format support, user interface updates and a refined user experience.

As a saying goes, "the better the quality of the merchandise, the higher the price." Many users would shrink back at the sight of the high price. Fortunately, after the installment of Microsoft Office 2010, thirty days of free evaluation period will be granted to the users, who want to extend the grace period as long as possible before having to activate the product for lifetime continuous usage.

Office 2010 also contains a so-called rearming function that gives you thirty extra days to activate the program. Do you know that the command can be used up to five times? In other words, this popular productivity suite can be rearmed five times, which means 5 x 30 = 150 days plus the original 30 days, it will give you a total of 180 days. It is almost half a year!

It is necessary to state that extending the grace period is not illegal, because "rearm" is an official feature that was made for the corporate users. Nevertheless, the "trick" has been widely publicized online to regular home users and Microsoft seems okay with it. That is the reason that I could share the nice tip with you to prolong the testing period.

1. Open elevated command prompt. To do this, you can:

A. Type CMD in Start menu search box, and hit Ctrl+Shift+Enter.

B. Go to Start menu, All Programs - Accessories, right-click on Command Prompt and select Run as administrator option.

2. Run OSPPREARM tool from command prompt. To do it, you need to enter the full path of OSPPREARM in the elevated Command Prompt. Generally, it is located in "C:/Program Files/Common Files/microsoft shared/OfficeSoftwareProtectionPlatform" folder (where "C" is your Windows drive letter). However, if you have installed 32-bit Office in 64-bit Windows, it is located in "Program Files (x86)".

3. Type the full path (you can also copy and paste the full path) of the OSPPREARM file in the elevated Command Prompt and hit Enter.

4. Exit the Command Prompt.

5. You are done, but you should remember that this command could only be used up to five times.

By the way, the products of Moyea Software, such as Moyea PPT to DVD Burner Pro, Moyea PPT to Video Converter and Moyea PPT to PDF Converter, are all compatible with PowerPoint 2010 perfectly, and able to convert the PowerPoint files to DVD, Video and PDF without loss of original file quality.

Welcome to try.

7/02/2009

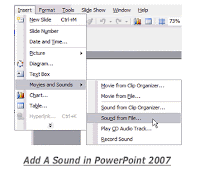
How to Add A Sound in PowerPoint 2007

Two steps are enough to insert a sound into a presentation of PowerPoint 2007.


Step 1 Insert the sound file you want to use in PowerPoint 2007

Go to your PowerPoint presentation, select Insert -> Movies and Sounds -> Sound from File. A window is displayed asking you which audio file you want to insert.


Step 2 Select the slide from the music
Once the file is selected, a second window appears, asking "How would you like the sound appears in the slideshow? "

Select "Automatically" for the sound that runs from the beginning of the slideshow.
Or, select "click" if you want the slide show begins when you click in the slideshow.
If you want the music to play across the slideshow, click the item "Loop until stop" in the "Sound Options".
Finally, to hide the sound icon on the slide show, click "Hide during slideshow" in the "Sound Options".

That's it! Enjoy your slideshow with sound.